Welcome to the world of fast and tasty cuisine: Quick Recipes. In this article, we present a series of quick yet delicious dishes suitable for anyone. From appetizers to sweet treats, these recipes are designed to help budding cooks enjoy culinary creation without unnecessary complexity.
Whether you’re a kitchen novice or simply looking for practical meal solutions, Quick Recipes offers easy-to-follow instructions and basic ingredients, demystifying the art of cooking for all. Embark on a flavorful adventure as we uncover the secrets behind preparing dishes that show cooking can be both simple and satisfying.
9 Quick Recipes for Instant Success
Pasta with Garlic & Olive Oil
Quick Recipes
Utensils Needed:
Ingredients:
- Bring a Large Pot of Salted Water to a Boil.
- Add the Pasta and Cook According to Package Instructions Until Al Dente.
- While the Pasta Cooks, Heat a Generous Amount of Olive Oil in a Skillet Over Medium-low Heat.
- Add the Minced Garlic to the Skillet and Sauté Gently Until It Becomes Fragrant and Just Starts to Turn Golden. Be Careful Not to Let It Brown or Burn.
- If You Enjoy Some Heat, Add a Pinch of Red Pepper Flakes to the Skillet Along With the Garlic.
- Once the Pasta is Cooked, Use Tongs or a Pasta Strainer to Transfer It Directly From the Pot to the Skillet With the Garlic and Oil.
- Toss the Pasta in the Garlic-infused Olive Oil Until It’s Well Coated.
- Season With Salt and Pepper to Taste.
- Optional: Garnish the Pasta With Chopped Fresh Parsley for a Burst of Color and Freshness.
- Serve the Pasta Immediately, Offering Grated Parmesan Cheese on the Side for Those Who Want an Extra Touch of Flavor.
Pasta with garlic and olive oil, a timeless and minimalist delight, epitomizes the art of simplicity in Italian cuisine. As the pot of pasta water comes to a rolling boil, anticipation builds for the exquisite yet straightforward flavors ahead. In a skillet, the golden elixir of olive oil mingles with freshly minced garlic, infusing the air with a fragrant promise. The al dente pasta emerges from its hot bath, immediately embraced by the garlic-kissed oil.
Avocado Toast
Quick Recipes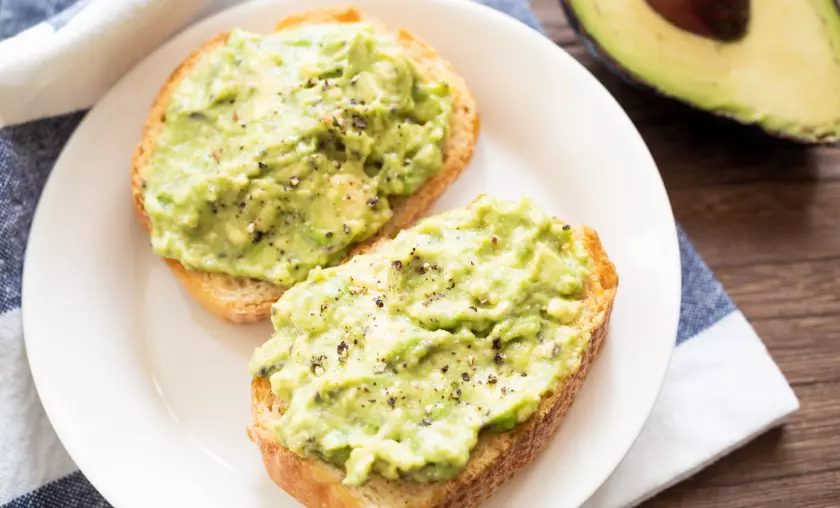
Utensils Needed:
Ingredients:
- Toast the Bread Slices in a Toaster or Toaster Oven Until They’re Golden and Crispy.
- While the Bread Toasts, Cut the Ripe Avocado in Half, Remove the Pit, and Scoop the Flesh Into a Bowl.
- Mash the Avocado With a Fork Until It Reaches Your Desired Level of Creaminess. If Desired, Add a Squeeze of Lemon Juice to Prevent Browning.
- Season the Mashed Avocado With a Pinch of Salt and a Dash of Pepper. Optionally, Add a Sprinkle of Red Pepper Flakes for Some Heat.
- Once the Bread is Toasted, Spread the Mashed Avocado Evenly Over Each Slice.
- If Desired, Drizzle a Touch of Olive Oil Over the Avocado for Added Richness.
- Top the Avocado Toast With Your Preferred Toppings, Whether It’s a Perfectly Poached Egg, Sliced Tomato, Crumbled Feta Cheese, or Other Creative Choices.
- Serve the Avocado Toast Immediately, Savoring the Vibrant Flavors and Textures.
Avocado toast, a modern culinary classic, embodies the marriage of health and indulgence on a single slice of bread. As the toaster hums with anticipation, the ripe avocado unveils its creamy treasure within. The knife effortlessly glides through the supple flesh, revealing a vibrant green canvas. With a gentle mash and a sprinkle of seasonings, the avocado takes on a new dimension—silky, zesty, and with a hint of heat if you choose.
Hummus & Veggie Wrap
Quick Recipes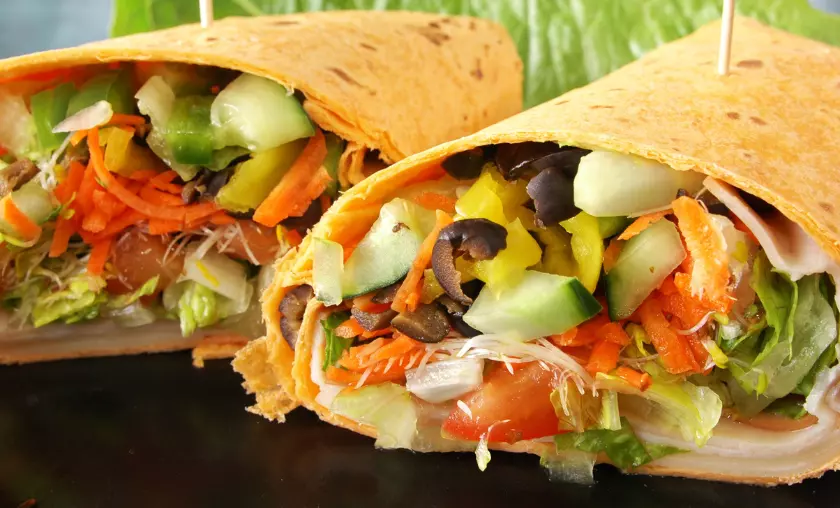
Utensils Needed:
Ingredients:
- Lay a Whole-grain Tortilla Wrap Flat on a Clean Surface.
- Using a Spoon or Spatula, Spread a Generous Layer of Hummus Over the Center of the Wrap, Leaving a Small Border Around the Edges.
- Layer Sliced Vegetables Over the Hummus, Arranging Them in a Single Row Across the Center of the Wrap.
- If Using, Sprinkle Crumbled Feta Cheese and Sliced Olives Over the Vegetables for Added Flavor and Texture.
- Drizzle a Touch of Lemon Juice Over the Vegetables for a Burst of Freshness.
- Season the Vegetables With a Pinch of Salt and a Dash of Pepper.
- If Desired, Add Thinly Sliced Red Onion for an Extra Kick of Flavor.
- Fold in the Sides of the Tortilla and Then Tightly Roll It Up, Enclosing the Fillings.
- Slice the Wrap in Half Diagonally for Easier Handling.
- Your Hummus and Veggie Wrap is Ready to Enjoy!
The hummus and veggie wrap, a celebration of wholesome goodness, encapsulates the essence of balanced nourishment in a convenient package. As the tortilla lays out its canvas, hummus emerges from its container, ready to embrace the creation. With a flick of a spoon, hummus transforms into a creamy bed, a canvas for a spectrum of colors. Vibrant bell peppers, crisp cucumbers, and verdant spinach become stars in this ensemble, adding both freshness and crunch.
Fruit Smoothie
Quick Recipes
Utensils Needed:
Ingredients:
- Wash and Prepare the Fruits by Cutting Them Into Smaller Pieces if Needed.
- Add the Assorted Fruits to the Blender.
- Add a Portion of Greek Yogurt for Creaminess and Protein.
- Pour in Your Choice of Liquid, Using More for a Thinner Consistency and Less for a Thicker One.
- If Desired, Drizzle in Honey or Maple Syrup for Extra Sweetness.
- Optional: Add a Few Ice Cubes to Make the Smoothie Colder and Thicker.
- Cover the Blender and Blend on High Until the Mixture is Smooth and Creamy.
- Taste and Adjust Sweetness or Thickness as Needed by Adding More Sweetener, Yogurt, or Liquid.
- Pour the Fruit Smoothie Into Glasses and Serve Immediately.
The fruit smoothie, a refreshing elixir of nature’s bounty, captures the vitality of fruits in a single sip. As the blender whirs to life, the fragrance of fresh and frozen fruits mingles, creating an anticipatory aroma. A symphony of colors converges, each fruit contributing its vibrant hue to the medley. The blender’s blades spin a ballet, transforming ingredients into a velvety potion. Creamy Greek yogurt lends body and protein, while the chosen liquid—be it milk, juice, or water—creates the desired consistency.
Pancakes
Quick Recipes
Utensils Needed:
Ingredients:
- In a Mixing Bowl, Whisk Together the Dry Ingredients: Flour, Baking Powder, and a Pinch of Salt.
- In a Separate Bowl, Beat the Egg and Add Milk. If Desired, Add a Splash of Vanilla Extract or a Bit of Sugar.
- Pour the Wet Ingredients Into the Dry Ingredients and Gently Stir Until Just Combined. Lumps Are Okay; Overmixing Can Make Pancakes Tough.
- Heat a Skillet or Griddle Over Medium Heat and Add a Small Amount of Butter or Oil to Prevent Sticking.
- Once the Skillet is Hot, Use a Ladle or Measuring Cup to Pour Batter Onto the Skillet. The Size of the Pancake is Up to You.
- Cook Until Bubbles Form on the Surface of the Pancake and the Edges Look Set.
- Carefully Flip the Pancake With a Spatula and Cook the Other Side Until It’s Golden Brown.
- Transfer the Cooked Pancake to a Plate and Keep Warm. Repeat the Process With the Remaining Batter.
- Serve the Pancakes With Your Favorite Toppings, Such as Maple Syrup, Fresh Fruit, Whipped Cream, or Chocolate Chips.
Pancakes, a timeless morning ritual, transform simple ingredients into golden delights that warm both the heart and soul. As the mixing bowl cradles the melding of flour, baking powder, and a touch of salt, the promise of fluffy goodness takes shape. In a separate vessel, eggs and milk unite, forming a creamy alliance that holds the power to nourish. The skillet hums with anticipation, a buttery canvas awaiting the pancake batter’s embrace.
Microwave Baked Potato
Quick Recipes
Utensils Needed:
Ingredients:
- Wash the Russet Potato Thoroughly Under Running Water and Pat It Dry With a Paper Towel.
- Use a Fork to Pierce the Potato’s Skin in a Few Places. This Helps Steam Escape During Cooking.
- Optionally, Rub a Small Amount of Olive Oil Over the Potato’s Skin for Added Flavor and to Prevent Drying.
- Place the Potato on a Microwave-safe Plate.
- Microwave the Potato on High for About 5-6 Minutes, Turning It Halfway Through the Cooking Time. Cooking Times May Vary Depending on the Size and Power of Your Microwave.
- Check the Potato for Doneness by Inserting a Fork or Knife Into the Center. It Should Glide in Easily.
- If the Potato is Not Fully Cooked, Microwave It in Additional 1-minute Intervals Until It’s Tender.
- Once the Potato is Cooked, Use Oven Mitts or a Towel to Carefully Remove It From the Microwave, as It Will Be Hot.
- Let the Potato Rest for a Minute or Two Before Slicing It Open.
- Season the Potato With Salt and Add Your Favorite Toppings, Such as Butter, Sour Cream, Chives, Cheese, or Bacon Bits.
The microwave-baked potato, a convenient creation of modern cooking, transforms a humble tuber into a tender, effortless delight. As the russet potato spins within the microwave’s embrace, the anticipation of warm comfort fills the air. The humble fork comes to the fore, puncturing the potato’s skin, allowing steam to escape and cook the interior to perfection. An optional embrace of olive oil caresses the skin, promising a hint of richness and moisture.
BLT Lettuce Wraps
Quick Recipes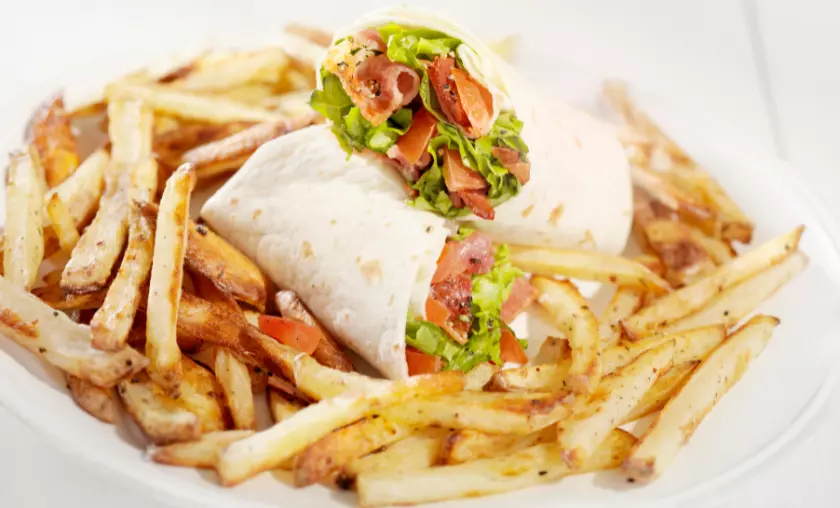
Utensils Needed:
Ingredients:
- Wash and Dry the Lettuce Leaves, Then Lay Them Out on a Clean Surface.
- Place a Slice of Cooked and Crispy Bacon in the Center of Each Lettuce Leaf.
- Top the Bacon With Tomato Slices, Arranging Them to Cover the Bacon Evenly.
- Drizzle a Small Amount of Mayonnaise Over the Tomatoes.
- Season With a Pinch of Salt and a Dash of Pepper.
- Carefully Fold the Sides of the Lettuce Leaves Over the Filling, Then Roll Them Up to Create a Neat Wrap.
- Secure the Wrap With a Toothpick if Needed.
- Repeat the Process With the Remaining Ingredients to Make Additional Wraps.
- Serve the Blt Lettuce Wraps Immediately as a Light and Refreshing Meal.
BLT lettuce wraps, a modern twist on a beloved classic, celebrate the beauty of simplicity in a light and refreshing package. As the lettuce leaves are carefully washed and patted dry, their vibrant green hues evoke a sense of crispness and vitality. The memory of sizzling bacon lingers in the air, a testament to the culinary magic that transforms humble ingredients into crispy treasures. Placed at the heart of each leaf, the bacon becomes a canvas for the bright tanginess of tomato slices, an ensemble of colors that hint at the feast to come.
Tuna Salad
Quick Recipes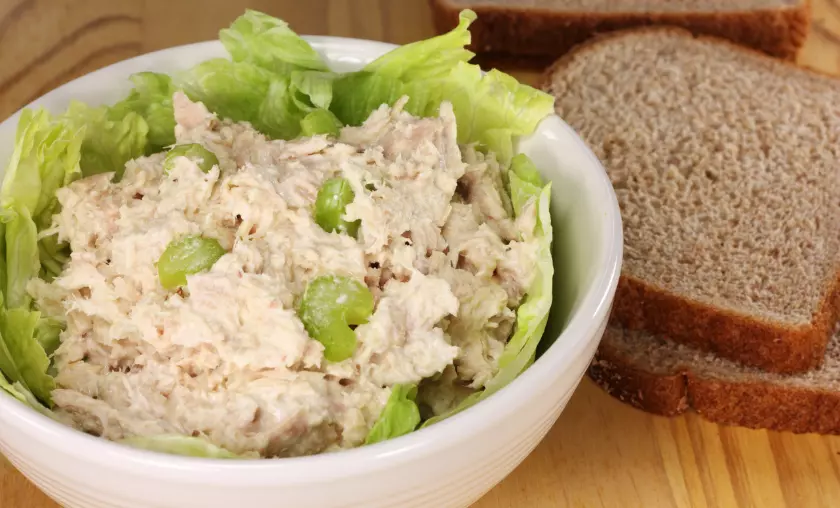
Utensils Needed:
Ingredients:
- Open and Drain the Canned Tuna, Then Flake It Into a Mixing Bowl Using a Fork.
- Add Diced Celery, Finely Chopped Red Onion, and Pickles or Relish (if Using) to the Bowl.
- Spoon in Mayonnaise and a Touch of Dijon Mustard (if Desired) for Creaminess and Flavor.
- Squeeze in a Bit of Fresh Lemon Juice to Brighten the Flavors.
- Season the Mixture With a Pinch of Salt and a Dash of Pepper.
- Gently Fold and Mix All the Ingredients in the Bowl Until Well Combined.
- Taste and Adjust the Seasonings or Add More Mayonnaise as Needed.
- If Using, Sprinkle Chopped Fresh Parsley Over the Tuna Salad for a Burst of Color and Freshness.
- Serve the Tuna Salad on Bread as a Sandwich or on Lettuce Leaves as a Wrap, Creating a Satisfying Meal.
Tuna salad, a melody of oceanic flavors and textures, brings the essence of the sea to the table in a harmonious blend. As the canned tuna is coaxed from its metal cocoon and flaked into a mixing bowl, the anticipation of the dish takes shape. Carefully diced celery and finely chopped red onion join the symphony, adding a crunch and sharpness that mirror the waves’ rhythm. A playful note of pickles or relish, if introduced, contributes a welcome contrast to the composition.
Caprese Salad
Quick Recipes
Utensils Needed:
Ingredients:
- Wash and Dry the Fresh Tomatoes, Then Slice Them Into Rounds.
- Similarly, Slice the Fresh Mozzarella Cheese Into Rounds.
- Arrange the Tomato and Mozzarella Slices on a Serving Plate, Alternating Them for a Visually Appealing Display.
- Tuck Fresh Basil Leaves Between the Tomato and Mozzarella Slices.
- Drizzle Extra-virgin Olive Oil Over the Salad, Allowing It to Cascade Gently Over the Ingredients.
- Optionally, Drizzle a Touch of Balsamic Vinegar Over the Salad for Added Sweetness and Depth.
- Season the Caprese Salad With a Sprinkle of Salt and a Grind of Fresh Black Pepper.
- Serve the Salad Immediately, Capturing the Essence of Summer’s Simplicity and Vibrant Flavors.
Caprese salad, an ode to the sun-kissed Mediterranean, weaves together the elegance of minimalism and the richness of natural flavors. As the knife gently slices through the tomatoes, the vivid red hue speaks of warmth and abundance. The fresh mozzarella, a creamy white canvas, beckons with its delicate promise. Nature’s finest—tomatoes, mozzarella, and basil—gather on the plate in harmonious unity, a visual representation of the harvest.
Conclusion
In summary, the collection of quick recipes offers a culinary passport to effortless yet delightful dining experiences. Whether faced with time constraints or seeking simple pleasures, these recipes cater to a spectrum of tastes and occasions. From the simplicity of avocado toast to the satisfaction of grilled cheese sandwiches, the array of options ensures a diverse range of choices for every palate.
Embracing these quick recipes is an invitation to culinary convenience without compromise. With minimal preparation, you can indulge in dishes that encompass flavors and nourishment. These recipes not only streamline meal preparation but also inspire personal creativity, allowing for customizations that cater to individual preferences. From energizing breakfasts to satisfying dinners, the versatility of these recipes demonstrates that delectable dining need not be time-consuming.
FAQ’s
What Types of Recipes Can I Expect to Find in the “Quick Recipes” Article?
The “Quick Recipes” article offers a variety of recipes designed for time-efficient cooking. You’ll discover options ranging from easy breakfasts like yogurt parfaits to savory dishes like stir-fried vegetables and quick pasta recipes.
Are These Recipes Suitable for Beginners in the Kitchen?
Absolutely. These recipes are tailored to be accessible for kitchen beginners and individuals with busy schedules. They prioritize simplicity without compromising on taste.
Can I Customize These Quick Recipes to My Taste Preferences?
Certainly. The article encourages personalization. You can add or substitute ingredients to match your taste preferences, making each dish uniquely yours.
How Do These Recipes Balance Convenience and Flavor?
These quick recipes focus on efficient preparation techniques while ensuring delicious flavors. They demonstrate that culinary convenience can coexist harmoniously with appetizing dishes.
Can These Quick Recipes Accommodate Different Meal Occasions?
Absolutely. The recipes are versatile and cater to various meal occasions. Whether you need a quick breakfast, a light lunch, or a speedy dinner, the “Quick Recipes” article provides options that suit different needs and schedules.
To Read More Similar Articles, Click Here.
Thanks for Visiting Our Website. If You Appreciate Our Work, Kindly Show Us Some Support in Our Comments Section 🙂


