Step into the enchanting realm of culinary creativity tailored expressly for young palates – Kid-Friendly Recipes. In this gastronomic haven, we embark on a delightful expedition that harmoniously combines nutrition with the whimsy of childhood. Each dish presented is a testament to the art of crafting flavors that captivate even the most discerning young eaters.
From playful snacks to nutritious meals, our collection celebrates the joy of nourishing young minds and bodies through enticing textures and delightful tastes. With every recipe, we embrace the challenge of making healthy eating an exciting adventure, transforming the dining table into a canvas of imagination and well-being.
9 Great Kid-Friendly Recipes
Macaroni & Cheese
Kid-Friendly Recipes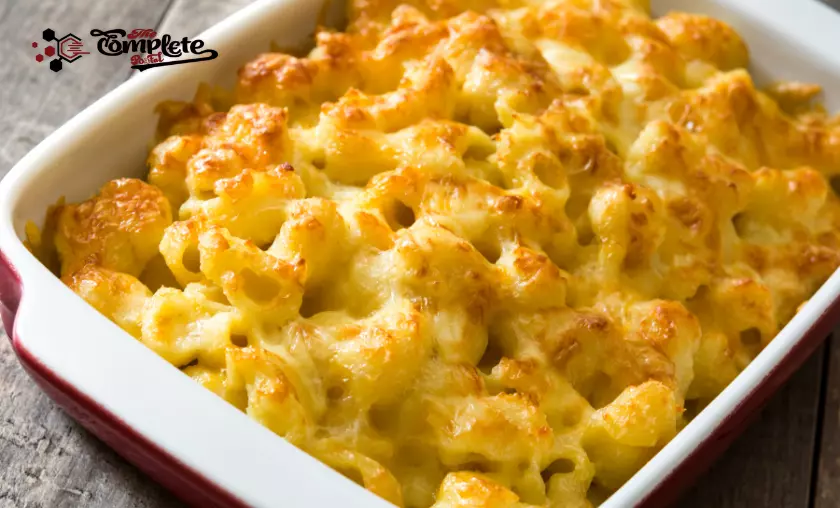
Utensils Needed:
Ingredients:
- Bring a Large Pot of Salted Water to a Boil.
- Add the Macaroni Pasta to the Boiling Water and Cook Until Al Dente. Drain the Pasta in a Colander and Set Aside.
- In a Saucepan, Melt a Portion of Butter Over Medium Heat.
- Stir in an Equal Amount of All-purpose Flour to Create a Roux. Cook the Roux for a Minute or Two to Eliminate the Raw Flour Taste.
- Gradually Whisk in Milk to Create a Smooth Sauce. Continue Whisking and Cooking Until the Sauce Thickens.
- Add Grated Cheese to the Sauce, Stirring Until It Melts and Creates a Creamy Cheese Sauce. Season With Salt and Pepper.
- Combine the Cooked Macaroni With the Cheese Sauce, Mixing Until the Pasta is Coated.
- If Desired, Transfer the Macaroni and Cheese Mixture to a Baking Dish and Sprinkle Breadcrumbs Over the Top for a Crispy Crust.
- Optionally, You Can Bake the Macaroni and Cheese in a Preheated Oven at 350°f (175°c) Until the Top is Golden and Bubbling.
- Serve the Macaroni and Cheese Hot, Savoring the Comforting Embrace of Cheesy Goodness.
Macaroni and cheese, a beloved classic that transcends generations, is a symphony of comfort and nostalgia. As the pot bubbles with anticipation, macaroni pasta takes center stage, its journey from hard to tender unfolding in the water’s warm embrace. In the saucepan, butter dances with flour, their union a canvas of possibility—a roux that’s the cornerstone of velvety indulgence. As milk cascades in, a sauce forms, its scent promising richness.
Mini Pizzas
Kid-Friendly Recipes
Utensils Needed:
Ingredients:
- Preheat the Oven to the Temperature Indicated on the Mini Pizza Crust Package or Your Recipe if Making Homemade Crusts.
- Place the Mini Pizza Crusts on a Baking Sheet or Pizza Stone.
- Spread a Thin Layer of Pizza Sauce Over Each Crust, Leaving a Border Around the Edges for the Crust to Puff Up.
- Sprinkle a Generous Amount of Shredded Mozzarella Cheese Over the Sauce.
- Add Your Choice of Assorted Toppings—pepperoni, Bell Peppers, Mushrooms, or Any Other Favorites.
- Drizzle a Small Amount of Olive Oil Over the Toppings to Enhance Flavor and Prevent Drying.
- If Desired, Sprinkle Dried Oregano or Italian Seasoning Over the Pizzas for an Aromatic Touch.
- Place the Baking Sheet or Pizza Stone in the Preheated Oven and Bake According to the Crust’s Package Instructions or Until the Cheese is Melted and Bubbly.
- Use Oven Mitts to Carefully Remove the Baking Sheet or Stone From the Oven.
- Let the Mini Pizzas Cool for a Minute Before Slicing and Serving.
Mini pizzas, a medley of personalization and flavor, invite us to explore culinary creativity in a handheld delight. As the oven preheats, mini pizza crusts take their place on the stage, their canvas eagerly awaiting an artist’s touch. Sauce, like a painter’s palette, is spread with care, its red hue promising a burst of tangy flavor. Mozzarella, a veil of creamy indulgence, blankets the canvas, each strand melting into the canvas below.
Chicken Tenders
Kid-Friendly Recipes
Utensils Needed:
Ingredients:
- Preheat the Oven to 425°f (220°c).
- Set Up a Breading Station: Place Flour in One Bowl, Beaten Eggs in Another, and Breadcrumbs in a Third Bowl. Season Each With a Pinch of Salt and Pepper.
- Dip Each Chicken Tender First Into the Flour, Shaking Off Excess, Then Into the Beaten Eggs, Allowing Excess to Drip Off, and Finally Into the Breadcrumbs, Pressing Gently to Adhere.
- Place the Breaded Chicken Tenders on a Wire Rack Set Over a Baking Sheet, or Directly on a Greased Baking Sheet.
- If Using a Wire Rack, This Promotes Even Browning. Otherwise, Arrange the Tenders Directly on the Baking Sheet.
- Drizzle or Spray a Bit of Cooking Oil Over the Breaded Chicken Tenders. This Helps Them Crisp Up in the Oven.
- Bake the Chicken Tenders in the Preheated Oven for About 15-20 Minutes or Until They Are Cooked Through and Golden Brown. Use a Cooking Thermometer to Ensure the Internal Temperature Reaches 165°f (74°c).
- Once Cooked, Remove the Chicken Tenders From the Oven and Allow Them to Cool Slightly Before Serving.
Chicken tenders, a testament to simplicity and flavor, embody the joy of crispy indulgence in every bite. As the oven preheats, chicken breast strips are transformed into canvas for culinary artistry. The breading station becomes a stage—a dance of flour, egg, and breadcrumbs—each step an essential part of the crispy embrace that follows. With seasoned breadcrumbs creating the promise of crunch, the tenders are laid on a wire rack, each piece poised for its transformation.
Peanut Butter & Jelly Sandwich
Kid-Friendly Recipes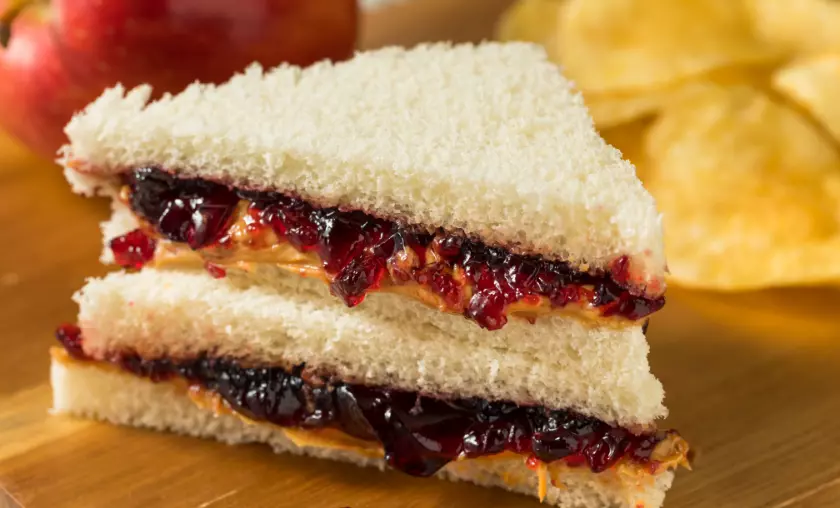
Utensils Needed:
Ingredients:
- Lay Out the Bread Slices on a Clean Surface.
- Using a Knife, Spread a Layer of Peanut Butter Onto One Side of One of the Bread Slices.
- On the Other Bread Slice, Spread a Layer of Jelly or Jam.
- Press the Two Slices of Bread Together, With the Peanut Butter and Jelly Sides Facing Each Other.
- Gently Press the Slices Together to Create a Sandwich.
- Optionally, You Can Cut the Sandwich in Half Diagonally for Easier Handling.
- Serve the Peanut Butter and Jelly Sandwich as a Timeless and Satisfying Combination of Flavors.
The peanut butter and jelly sandwich, a symphony of childhood nostalgia and comfort, invites us to savor the simplest of pleasures. As bread slices find their place, a generous layer of peanut butter is spread with anticipation—a creamy embrace that awaits its counterpart. On the other slice, jelly or jam makes its appearance, a burst of fruity sweetness that promises a delightful contrast.
Spaghetti with Meatballs
Kid-Friendly Recipes
Utensils Needed:
Ingredients:
- Bring a Large Pot of Salted Water to a Boil.
- While the Water Heats, Prepare the Meatballs. In a Mixing Bowl, Combine Ground Meat, Breadcrumbs, Finely Chopped Onion, Minced Garlic, Grated Parmesan Cheese, a Beaten Egg, Salt, and Pepper. Mix Until Well Combined.
- Shape the Meat Mixture Into Meatballs of Your Desired Size.
- Heat a Skillet Over Medium Heat and Add a Bit of Olive Oil.
- Add the Meatballs to the Skillet and Cook Until They’re Browned on All Sides and Cooked Through. You Can Also Bake the Meatballs on a Baking Sheet in a Preheated Oven at 375°f (190°c) for About 20-25 Minutes.
- While the Meatballs Cook, Add the Spaghetti to the Boiling Water and Cook According to the Package Instructions Until Al Dente. Drain the Spaghetti in a Colander.
- In the Same Skillet Used for the Meatballs, Add Tomato Sauce and Heat It.
- Once the Meatballs Are Cooked, Add Them to the Tomato Sauce to Simmer for a Few Minutes, Allowing the Flavors to Meld.
- Serve the Meatballs and Sauce Over Cooked Spaghetti.
- Optionally, Garnish With Fresh Basil Leaves for a Burst of Color and Freshness.
Spaghetti with meatballs, a culinary embrace that transcends generations, is a symphony of flavors and tradition. As the pot comes to life, water simmers, inviting spaghetti to dance in its alchemical embrace. Meanwhile, in a mixing bowl, ground meat mingles with breadcrumbs, onion, garlic, and Parmesan cheese—a composition that echoes family recipes passed down through time. Meatballs, shaped with care, find their place in a skillet, each side turning golden in a tribute to technique.
Chicken Tacos
Kid-Friendly Recipes
Utensils Needed:
Ingredients:
- Season the Chicken Breasts or Thighs With Taco Seasoning, Coating Them Evenly.
- Heat a Skillet Over Medium-high Heat and Add a Bit of Cooking Oil.
- Add the Seasoned Chicken to the Skillet and Cook Until It’s Fully Cooked and Browned on Both Sides. Use Tongs to Flip the Chicken as Needed.
- Once Cooked, Remove the Chicken From the Skillet and Let It Rest for a Few Minutes. Then, Slice or Shred the Chicken Into Bite-sized Pieces.
- Warm the Flour or Corn Tortillas in the Skillet or Microwave.
- Set Up a Taco Assembly Station With Assorted Taco Toppings.
- Fill Each Tortilla With a Portion of the Cooked Chicken and Your Choice of Toppings.
- Squeeze a Bit of Lime Juice Over the Tacos for a Burst of Freshness.
- Fold the Tortillas Around the Fillings to Create Tacos.
- Serve the Chicken Tacos Hot and Enjoy the Flavorful Combination of Ingredients.
Chicken tacos, a celebration of vibrant flavors and textures, invite us to indulge in the joy of handheld perfection. As the skillet heats, chicken breasts or thighs take center stage, their transformation into savory artistry guided by the sprinkling of taco seasoning. With a sizzle that sings of anticipation, the chicken cooks to a golden hue, each side telling a tale of heat and mastery. A brief moment of rest follows, allowing the chicken to gather its flavors.
Chicken Nuggets
Kid-Friendly Recipes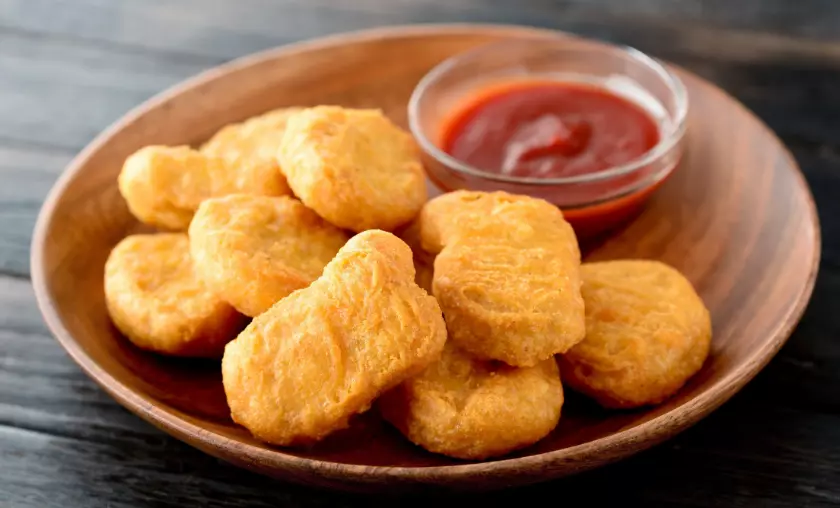
Utensils Needed:
Ingredients:
- Preheat the Oven to 400°f (200°c).
- Set Up a Breading Station: Place Flour in One Bowl, Beaten Eggs in Another, and Breadcrumbs in a Third Bowl. Season Each With a Pinch of Salt and Pepper.
- Dip Each Piece of Chicken Into the Flour, Shaking Off Excess, Then Into the Beaten Eggs, Allowing Excess to Drip Off, and Finally Into the Breadcrumbs, Pressing Gently to Adhere.
- Place the Breaded Chicken Nuggets on a Wire Rack Set Over a Baking Sheet, or Directly on a Greased Baking Sheet.
- If Using a Wire Rack, It Promotes Even Baking. Otherwise, Arrange the Nuggets Directly on the Baking Sheet.
- Lightly Spray the Chicken Nuggets With Cooking Oil to Encourage Crispiness.
- Bake the Chicken Nuggets in the Preheated Oven for About 15-20 Minutes, Turning Them Halfway Through, Until They’re Golden Brown and Cooked Through.
- Use a Cooking Thermometer to Ensure the Internal Temperature Reaches 165°f (74°c).
- Once Cooked, Remove the Baking Sheet From the Oven and Let the Chicken Nuggets Cool Slightly Before Serving.
Chicken nuggets, the embodiment of simplicity and satisfaction, captivate our senses in each bite. As the oven heats, chicken pieces are transformed into golden treasures, their breading a promise of delightful crunch. The breading station, an orchestra of flour, eggs, and breadcrumbs, comes to life, each dip and press a stroke of culinary mastery. Arranged on a wire rack, the nuggets await the oven’s embrace.
Fruit Smoothies
Kid-Friendly Recipes
Utensils Needed:
Ingredients:
- Choose a Variety of Fruits for Your Smoothie. Wash and Chop Them Into Smaller Pieces for Easier Blending.
- Place the Chopped Fruits Into the Blender.
- Add a Portion of Yogurt or Milk to the Blender. The Amount Will Depend on How Thick You Want Your Smoothie to Be.
- If Desired, Add a Drizzle of Liquid Sweetener for Extra Sweetness.
- Toss in a Handful of Ice Cubes to Make the Smoothie Cold and Refreshing.
- Blend the Ingredients on High Until the Mixture is Smooth and Creamy.
- If the Smoothie is Too Thick, You Can Add More Liquid and Blend Again Until You Reach the Desired Consistency.
- Taste the Smoothie and Adjust the Sweetness or Thickness if Needed by Adding More Sweetener or Liquid.
- Once Blended to Perfection, Pour the Smoothie Into Glasses and Enjoy Immediately.
Fruit smoothies, an ode to nature’s bounty, invite us to savor the symphony of flavors and colors in a single sip. As the blender’s whirr fills the air, a colorful array of fruits finds its way into the vessel—a celebration of vibrant sweetness. A dash of yogurt or milk adds creamy indulgence, while ice cubes promise an invigorating chill. The liquid sweetener, like a gentle whisper of delight, enhances the fruit’s natural sugars.
Cookies
Kid-Friendly Recipes
Utensils Needed:
Ingredients:
- Preheat the Oven to 375°f (190°c).
- In a Mixing Bowl, Cream Together Softened Butter, Granulated Sugar, and Brown Sugar Until Light and Fluffy Using an Electric Mixer or Whisk.
- Add Eggs One at a Time, Mixing Well After Each Addition. Mix in Vanilla Extract.
- In a Separate Bowl, Whisk Together Flour, Baking Soda, and Salt.
- Gradually Add the Dry Ingredient Mixture to the Wet Ingredients, Mixing Until Just Combined.
- If Using, Fold in Chocolate Chips, Nuts, or Other Add-ins of Your Choice.
- Drop Spoonfuls of Cookie Dough Onto Baking Sheets Lined With Parchment Paper or Lightly Greased.
- Bake in the Preheated Oven for About 8-10 Minutes, or Until the Edges Are Golden Brown.
- Allow the Cookies to Cool on the Baking Sheets for a Few Minutes Before Transferring Them to a Wire Rack to Cool Completely.
- Once Cooled, Enjoy the Freshly Baked Cookies With a Glass of Milk or Your Favorite Beverage.
Cookies, a testament to the heart’s warm embrace, invite us to indulge in the simplicity of baking and the joy of shared moments. As the oven preheats, butter softens, its transformation a reminder of culinary magic. Mixing bowls become a canvas—a dance of sugars and eggs that unfolds as the aroma of nostalgia fills the air. The rhythm of the electric mixer, a gentle symphony, accompanies the melding of ingredients, each fold a celebration of technique.
Conclusion
In summation, the array of kid-friendly recipes serves as a delightful culinary voyage, steering towards meals that captivate young tastes and spark their imagination. From playful mini pizzas to comforting classics like macaroni and cheese, these recipes reimagine the art of nourishing young palates.
By embracing these recipes, you embark on a journey that transforms mealtime into a joyous adventure, celebrating flavors that resonate with children while maintaining a focus on wholesome ingredients. As you navigate the world of kid-approved cuisine, these recipes stand as a testament to the magic of combining creativity, nutrition, and the sheer delight of satisfying even the most discerning young eaters.
FAQ’s
Can I Involve My Kids in the Cooking Process With These Recipes?
Yes, definitely. Many of these recipes are great for involving kids in the kitchen, encouraging them to help assemble and create their meals.
Are These Recipes Nutritious While Still Being Appealing to Kids?
Absolutely. These recipes are crafted to offer a balance between appealing flavors and wholesome ingredients, ensuring that kids enjoy both tasty and nutritious meals.
Can I Find Both Main Meals and Snacks in the Collection?
Yes, you’ll find a variety of recipes suitable for different occasions, including main meals, snacks, and even creative breakfast ideas.
How Do These Kid-friendly Recipes Make Mealtime Enjoyable for Families?
These recipes cater to children’s preferences, making mealtime more enjoyable and less stressful for parents. They encourage kids to engage with food in a fun and positive way.
Can These Kid-friendly Recipes Help Introduce Kids to New Foods?
Absolutely. These recipes often present familiar ingredients in creative ways, which can help kids become more open to trying new foods and flavors in a playful and enjoyable manner.
To Read More Similar Articles, Click Here.
Thanks for Visiting Our Website. If You Appreciate Our Work, Kindly Show Us Some Support in Our Comments Section 🙂


