Welcome to a culinary odyssey that encompasses both dietary preferences and delicious indulgence – Dairy-Free Recipes. In these pages, we embark on a journey that redefines culinary boundaries by creating dishes that are dairy-free, yet rich in flavor and indulgence. As we read through this collection, we discover a series of recipes designed to accommodate those who wish to avoid dairy products.
From creamy delights to savory wonders, each creation exemplifies the art of combining ingredients to create lush textures and flavors. With each dish, we honor the diversity of diets and culinary innovations, ensuring that every bite is a symphony of nutrition and pleasure.
10 Great Dairy-Free Recipes
Coconut Curry
Dairy-Free Recipes
Utensils Needed:
Ingredients:
- In a Large Pot or Skillet, Heat a Drizzle of Olive Oil Over Medium Heat.
- Add Chopped Onion and Sauté Until It’s Softened and Translucent.
- Stir in Minced Garlic and Grated Ginger, and Cook Until Fragrant.
- Sprinkle Curry Powder, Ground Cumin, Ground Coriander, Turmeric Powder, and Red Pepper Flakes (if Using) Over the Onion Mixture. Stir to Coat the Onions With the Spices.
- Add the Protein of Your Choice to the Pot and Cook Until It’s No Longer Pink (if Using Chicken) or Until It’s Heated Through (if Using Shrimp or Tofu).
- Pour in Canned Diced Tomatoes, Along With Their Juices. Mix Well to Combine.
- Add Chopped Vegetables to the Pot and Sauté for a Few Minutes.
- Pour in Coconut Milk and Let the Mixture Simmer for About 15-20 Minutes, Allowing the Flavors to Meld and the Vegetables to Cook.
- Season the Curry With Salt and Pepper to Taste.
- Once the Vegetables Are Tender and the Flavors Are Well Combined, Remove the Pot From Heat.
- Serve the Coconut Curry Hot, Garnished With Fresh Cilantro Leaves.
- Enjoy the Curry With Rice or Naan Bread.
Coconut curry, a bowl of comfort and exotic aromas, invites us to journey through a medley of flavors and textures. In the pot’s warmth, onions sauté—a prelude to a symphony of spices that tell tales of distant lands. Garlic’s allure and grated ginger’s zing join the ensemble, their notes harmonizing with each stir. Curry powder, cumin, coriander, turmeric, and red pepper flakes form a tapestry of colors and aromas, their mingling a dance of warmth and intrigue.
Stir-Fried Tofu
Dairy-Free Recipes
Utensils Needed:
Ingredients:
- Start by Pressing the Cubed Tofu to Remove Excess Moisture. You Can Do This by Placing the Tofu on a Clean Kitchen Towel or Paper Towels, Covering It With Another Layer, and Gently Pressing to Absorb Moisture.
- In a Bowl, Whisk Together Soy Sauce or Tamari, Grated Ginger, and Minced Garlic to Create the Marinade.
- Add the Tofu Cubes to the Marinade and Let Them Soak for About 15-20 Minutes to Absorb the Flavors.
- In a Wok or Skillet, Heat a Drizzle of Olive Oil or Use Cooking Spray Over Medium-high Heat.
- Add Sliced Onion and Sauté Until It’s Softened and Translucent.
- Add the Marinated Tofu Cubes to the Wok, Reserving Any Excess Marinade for Later.
- Cook the Tofu Cubes Until They’re Golden and Slightly Crispy on the Edges. Remove the Tofu From the Wok and Set It Aside.
- In the Same Wok, Add a Bit More Oil if Needed, and Sauté the Assorted Vegetables Until They’re Tender-crisp.
- If Using, Add Mushrooms, Snap Peas, or Baby Corn to the Wok and Sauté Briefly.
- Return the Cooked Tofu to the Wok and Pour in Any Reserved Marinade.
- Drizzle Sesame Oil Over the Tofu and Vegetables, and Toss to Coat Everything Evenly.
- In a Small Bowl, Mix a Teaspoon of Cornstarch With a Bit of Water to Create a Slurry. Pour This Into the Wok to Thicken the Sauce.
- Season With Salt and Pepper to Taste and Toss Everything Together Until the Tofu and Vegetables Are Coated With the Sauce.
- Once Everything is Heated Through, Remove the Wok From Heat.
- Serve the Stir-fried Tofu Hot, Garnished With Sesame Seeds.
- Enjoy the Tofu Over Rice or Noodles.
Stir-fried tofu, a savory symphony of flavors and textures, invites us to explore the art of transforming humble ingredients into a masterpiece. In a bowl, tofu cubes soak in a marinade—a fusion of soy sauce, grated ginger, and minced garlic. As they absorb the essence of the marinade, they become a canvas for flavors that promise depth and delight. In the wok’s embrace, onions sauté—a prelude to a dance that unfolds with each stir.
Banana Pancakes
Dairy-Free Recipes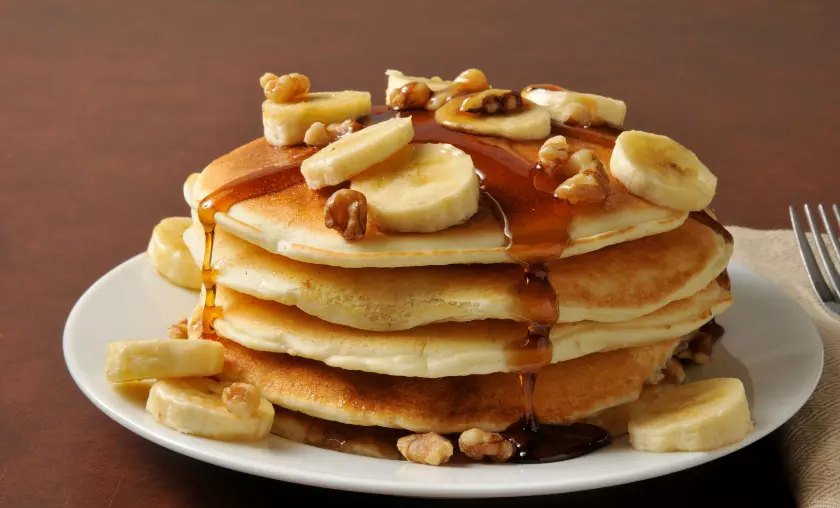
Utensils Needed:
Ingredients:
- In a Mixing Bowl, Combine Mashed Ripe Bananas and Eggs. Mix Until Well Blended.
- Add Flour, Baking Powder, and a Pinch of Salt to the Banana and Egg Mixture.
- Pour in Milk and Vanilla Extract. Mix All the Ingredients Until You Have a Smooth Batter.
- If Desired, Fold in Optional Add-ins Such as Cinnamon, Chocolate Chips, or Chopped Nuts.
- Heat a Non-stick Skillet or Griddle Over Medium Heat. You Can Lightly Grease It With Cooking Spray or a Bit of Butter if Needed.
- Once the Skillet is Hot, Ladle the Pancake Batter Onto the Skillet to Create Pancakes of Your Desired Size.
- Cook the Pancakes for a Few Minutes on One Side, Until You See Bubbles Forming on the Surface.
- Gently Flip the Pancakes Using a Spatula and Cook for a Few More Minutes on the Other Side, Until Both Sides Are Golden Brown.
- Continue the Process Until You’ve Used Up All the Batter.
- Serve the Banana Pancakes Warm, Stacked, and Topped With Additional Banana Slices or Your Favorite Toppings.
Banana pancakes, a delightful fusion of comfort and nostalgia, beckon us to embrace the joy of a leisurely breakfast. In a mixing bowl, ripe bananas and eggs intertwine—a medley of natural sweetness and creamy texture. Flour joins the mix, its presence a promise of fluffy perfection, and baking powder ensures a rise that brings smiles. Milk and vanilla extract contribute to the dance, creating a batter that whispers of indulgence and warmth.
Zucchini Noodles with Tomato Sauce
Dairy-Free Recipes
Utensils Needed:
Ingredients:
- Start by Spiralizing the Zucchini to Create Zucchini Noodles (“Zoodles”). Alternatively, You Can Use a Vegetable Peeler to Create Thin Strips Resembling Noodles.
- In a Skillet, Heat Olive Oil Over Medium Heat.
- Add Minced Garlic to the Skillet and Sauté for a Minute or Until Fragrant.
- Pour in Canned Crushed Tomatoes and Add Italian Seasoning, Red Pepper Flakes (if Using), Salt, and Pepper. Stir Well to Combine the Flavors.
- Let the Tomato Sauce Simmer for About 10-15 Minutes, Allowing It to Thicken and the Flavors to Meld.
- In Another Pan, Heat a Bit of Olive Oil Over Medium Heat.
- Add the Zucchini Noodles to the Pan and Sauté for a Few Minutes Until They’re Just Tender. Be Careful Not to Overcook; Zucchini Noodles Should Maintain Their Texture.
- Once the Zucchini Noodles Are Cooked, Remove Them From the Heat.
- Serve the Zucchini Noodles With the Tomato Sauce Spooned Over the Top.
- Garnish With Fresh Basil Leaves and Grated Parmesan Cheese if Desired.
Zucchini noodles with tomato sauce, a marriage of health and comfort, invite us to savor the essence of classic pasta with a fresh twist. As zucchini meets the spiralizer’s embrace, it transforms into delicate ribbons, an elegant alternative to traditional pasta. In the skillet, olive oil heats—a canvas for minced garlic that dances and sings. Crushed tomatoes make their entrance, a chorus of flavors that’s both rich and vibrant.
Mango Coconut Chia Pudding
Dairy-Free Recipes
Utensils Needed:
Ingredients:
- In a Mixing Bowl, Combine Chia Seeds and Coconut Milk. Use a Whisk or Fork to Stir Well, Ensuring the Chia Seeds Are Evenly Distributed.
- If Desired, Add a Touch of Honey or Maple Syrup for Sweetness, and a Splash of Vanilla Extract for Flavor. Mix Again.
- Allow the Chia Seed Mixture to Sit for About 5 Minutes, Then Give It Another Stir to Prevent Clumping.
- Cover the Mixing Bowl With Plastic Wrap or Transfer the Mixture to Sealed Containers or Jars.
- Refrigerate the Chia Seed Mixture for at Least 2 Hours, or Ideally Overnight. During This Time, the Chia Seeds Will Absorb the Liquid and Create a Pudding-like Consistency.
- Before Serving, Dice Fresh Ripe Mango and Layer It on Top of the Chia Pudding.
- Garnish the Pudding With Toasted Coconut Flakes for a Delightful Crunch and Tropical Flair.
- Enjoy the Mango Coconut Chia Pudding as a Satisfying and Nutritious Breakfast, Snack, or Dessert.
Mango coconut chia pudding, a harmonious blend of flavors and textures, invites us to embrace the joys of a wholesome treat. In a mixing bowl, chia seeds and coconut milk intermingle—a pairing that’s both luxurious and nourishing. As honey or maple syrup and a splash of vanilla extract join the mix, the seeds begin their transformation, swelling in the embrace of liquid comfort. The bowl, covered in anticipation, takes its place in the refrigerator, allowing time for magic to unfold.
Sweet Potato & Black Bean Bowl
Dairy-Free Recipes
Utensils Needed:
Ingredients:
- Preheat the Oven to 400°f (200°c) and Line a Baking Sheet With Parchment Paper.
- In a Mixing Bowl, Toss the Peeled and Cubed Sweet Potatoes With Olive Oil, Smoked Paprika, Ground Cumin, Salt, and Pepper.
- Spread the Seasoned Sweet Potato Cubes on the Prepared Baking Sheet in a Single Layer.
- Roast the Sweet Potatoes in the Preheated Oven for About 20-25 Minutes, or Until They’re Tender and Slightly Crispy on the Edges.
- While the Sweet Potatoes Are Roasting, Heat a Skillet Over Medium Heat.
- Add the Cooked and Drained Black Beans to the Skillet and Season With a Pinch of Smoked Paprika, Ground Cumin, Salt, and Pepper. Cook for a Few Minutes Until Heated Through.
- Once the Sweet Potatoes Are Ready, Remove Them From the Oven.
- In a Bowl, Assemble the Sweet Potato and Black Bean Bowl: Start With a Base of Roasted Sweet Potatoes, Top With Seasoned Black Beans, and Drizzle With Lime Juice.
- Add Slices of Avocado for Creaminess and a Burst of Color.
- Garnish the Bowl With Fresh Cilantro Leaves and a Dollop of Greek Yogurt or Sour Cream if Desired.
Sweet potato and black bean bowl, a celebration of colors and flavors, beckons us to experience the magic of vibrant ingredients in harmony. On a baking sheet, sweet potato cubes await their transformation—a toss in olive oil and a sprinkle of spices, a promise of roasty perfection. As they roast in the oven’s warmth, they become golden and tender, their edges kissed by crispiness. In a skillet, black beans take center stage—a sizzle of smoked paprika and ground cumin infusing them with depth and intrigue.
Vegan Tacos
Dairy-Free Recipes
Utensils Needed:
Ingredients:
- In a Skillet, Heat a Bit of Oil Over Medium Heat.
- Add Sliced Assorted Vegetables to the Skillet and Sauté Until They’re Tender and Slightly Caramelized.
- If Using Canned Black Beans, Heat Them in a Separate Skillet. Season With Ground Cumin, Chili Powder, Paprika, and a Splash of Lime Juice. Mash Them Slightly for Added Texture.
- Warm the Corn Tortillas in a Dry Skillet or Microwave.
- To Assemble the Vegan Tacos, Spoon a Layer of Black Beans Onto a Tortilla.
- Top the Beans With Sautéed Assorted Vegetables for a Medley of Flavors.
- Add Slices of Avocado for Creaminess and a Touch of Freshness.
- Garnish the Tacos With Fresh Cilantro Leaves and a Dollop of Vegan Sour Cream or Dairy-free Yogurt if Desired.
- Finish by Drizzling Salsa or Pico De Gallo Over the Top for a Burst of Tangy Goodness.
- Serve the Vegan Tacos With Lime Wedges on the Side.
Vegan tacos, a fusion of plant-based flavors and textures, invite us to explore the art of crafting satisfying and compassionate meals. In a skillet, assorted vegetables sizzle—a symphony of colors and aromas that dance in harmony. On another burner, black beans heat up, their earthiness infused with ground cumin, chili powder, and the brightness of lime juice. As the tortillas warm, the assembly begins—an act of layering and creativity.
Roasted Vegetable Medley
Dairy-Free Recipes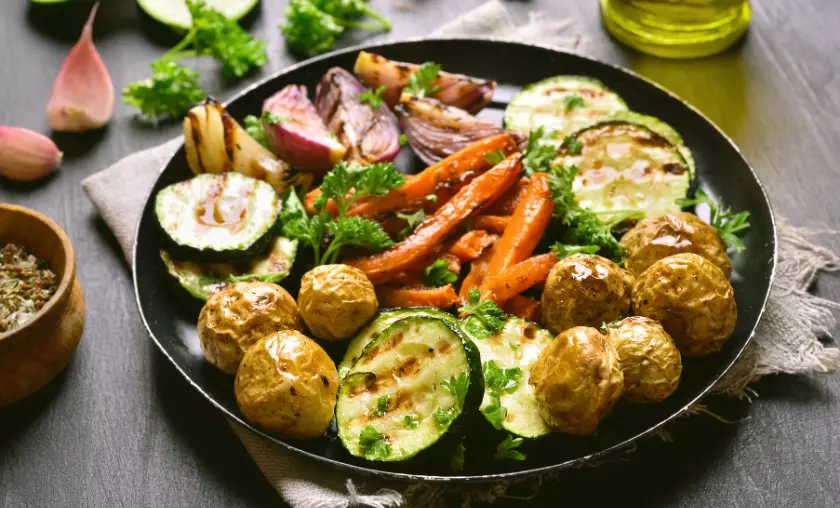
Utensils Needed:
Ingredients:
- Preheat the Oven to 400°f (200°c) and Line a Baking Sheet With Parchment Paper.
- In a Mixing Bowl, Toss the Chopped or Sliced Assorted Vegetables With Olive Oil, Minced Garlic, Chopped Fresh Herbs, Salt, and Pepper.
- Ensure That the Vegetables Are Well Coated With the Olive Oil and Seasonings.
- Spread the Seasoned Vegetables on the Prepared Baking Sheet in a Single Layer.
- Roast the Vegetable Medley in the Preheated Oven for About 20-25 Minutes, or Until the Vegetables Are Tender and Slightly Caramelized at the Edges.
- Check and Stir the Vegetables Halfway Through the Roasting Time to Ensure Even Cooking.
- Once the Roasted Vegetable Medley is Ready, Remove It From the Oven.
- Transfer the Vegetables to a Serving Platter or Dish.
- Garnish With Additional Chopped Fresh Herbs if Desired.
- Serve the Roasted Vegetable Medley as a Flavorful Side Dish or as a Main Course With Grains or Protein of Your Choice.
Roasted vegetable medley, a canvas of colors and flavors, beckons us to experience the beauty of nature’s bounty in every bite. In a mixing bowl, assorted vegetables converge—an array of shapes and hues that promise both nourishment and visual delight. Olive oil joins the ensemble, glistening drops that carry the aroma of possibility. Chopped garlic infuses the vegetables with depth, while fresh herbs bring notes of thyme, rosemary, or oregano to the mix. As the seasoned vegetables are spread on the baking sheet, they become a symphony of sizzles and aromas, an anticipation of what’s to come.
Cauliflower Alfredo
Dairy-Free Recipes
Utensils Needed:
Ingredients:
- In a Pot, Bring Water to a Boil. Add the Cauliflower Florets and Cook Until They’re Tender. Drain and Set Aside.
- In a Skillet, Heat Olive Oil Over Medium Heat. Add Minced Garlic and Sauté Until Fragrant.
- Combine the Cooked Cauliflower, Sautéed Garlic, Vegetable Broth, Unsweetened Almond Milk, Nutritional Yeast, and a Squeeze of Lemon Juice in a Blender or Food Processor.
- Blend the Mixture Until Smooth and Creamy. If Needed, You Can Add More Almond Milk to Achieve the Desired Consistency.
- Season the Cauliflower Mixture With Salt and Pepper to Taste.
- Cook the Fettuccine Pasta According to the Package Instructions. Drain and Set Aside.
- In a Pot, Warm the Cauliflower Alfredo Sauce Over Medium Heat.
- Toss the Cooked Pasta in the Warm Sauce Until It’s Well Coated.
- Serve the Cauliflower Alfredo Pasta in Bowls, Garnished With Fresh Parsley or Basil.
- Enjoy This Creamy and Dairy-free Twist on a Classic Alfredo Dish.
Cauliflower Alfredo, a velvety creation that bridges indulgence and wellness, invites us to reimagine a classic dish with a plant-based twist. In a pot of simmering water, cauliflower florets soften and transform, becoming the cornerstone of a creamy sauce. Garlic dances in olive oil, its fragrance hinting at the richness to come. In the blender’s embrace, cooked cauliflower meets sautéed garlic, vegetable broth, and the delicate creaminess of unsweetened almond milk.
Gluten-Free Banana Bread
Dairy-Free Recipes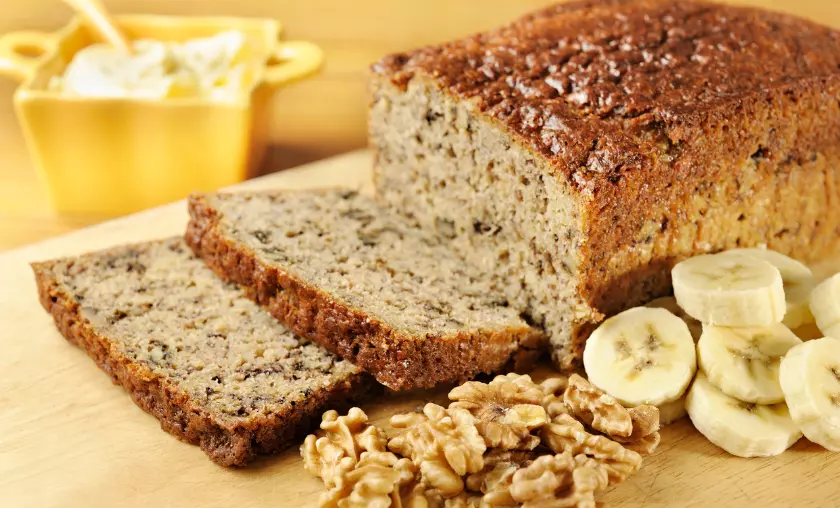
Utensils needed:
Ingredients:
- Preheat the oven to 350°F (175°C) and grease or line a loaf pan.
- In a mixing bowl, mash the ripe bananas using a fork or potato masher until mostly smooth.
- Whisk in the eggs, olive oil or melted coconut oil, honey or maple syrup, and vanilla extract until well combined.
- In a separate bowl, combine the gluten-free flour blend, baking soda, salt, and cinnamon if using.
- Gradually add the dry ingredients to the wet ingredients, stirring until just combined.
- If desired, fold in chopped nuts for added texture and flavor.
- Pour the batter into the prepared loaf pan and smooth the top with a spatula.
- Bake in the preheated oven for about 45-55 minutes, or until a toothpick inserted into the center comes out clean.
- Allow the banana bread to cool in the pan for a few minutes, then transfer it to a wire rack to cool completely.
- Once cooled, slice the gluten-free banana bread and enjoy!
Gluten-free banana bread, a tribute to both nostalgia and nourishment, invites us to relish the art of baking with a twist of dietary accommodation. In a mixing bowl, ripe bananas are transformed—a dance of mashing yields a canvas of natural sweetness and earthy aroma. As eggs, olive oil or coconut oil, honey or maple syrup, and vanilla extract join the mix, the symphony of ingredients harmonizes into a wet batter, a promise of flavors yet to unfold.
Conclusion
In conclusion, the compilation of dairy-free recipes embarks on a journey that marries culinary delight with dietary considerations. From inventive mains to delectable desserts, these recipes redefine the possibilities of dairy-free cooking. By embracing these recipes, you embark on a voyage that celebrates flavor without compromise, showcasing that dairy-free meals can be both satisfying and indulgent.
Whether you follow a dairy-free lifestyle by necessity or choice, these recipes stand as a testament to the art of crafting meals that prioritize health and preference. As you savor the amalgamation of ingredients and delight in the richness of flavors, these recipes remind us that dairy-free cuisine opens doors to an array of culinary pleasures, enhancing both taste and well-being in harmonious coexistence.
FAQ’s
Can I Expect These Recipes to Be Both Flavorful and Dairy-free?
Certainly. These recipes are crafted to deliver both satisfying flavors and dairy-free alternatives, proving that you can enjoy rich and indulgent meals without dairy.
Can I Find Dairy-free Alternatives for Traditional Ingredients in These Recipes?
Yes, many of these recipes provide dairy-free substitutions for common ingredients like milk, butter, and cheese, making them accessible to those who avoid dairy.
Are These Recipes Suitable for Various Dietary Preferences in Addition to Being Dairy-free?
Indeed. While these recipes are primarily dairy-free, they often cater to various dietary preferences, including vegetarian, vegan, and gluten-free options.
How Do These Dairy-free Recipes Cater to Individuals Transitioning to Dairy-free Cooking?
These recipes offer a seamless transition to dairy-free cooking by presenting a variety of flavorful alternatives that align with dietary needs, encouraging a positive and enjoyable shift.
Can I Personalize These Dairy-free Recipes to Suit My Taste Preferences?
Absolutely. These recipes can be customized by substituting ingredients or adding seasonings to match your unique taste and dietary requirements, while still maintaining their dairy-free essence.
To Read More Similar Articles, Click Here.
Thanks for Visiting Our Website. If You Appreciate Our Work, Kindly Show Us Some Support in Our Comments Section 🙂


